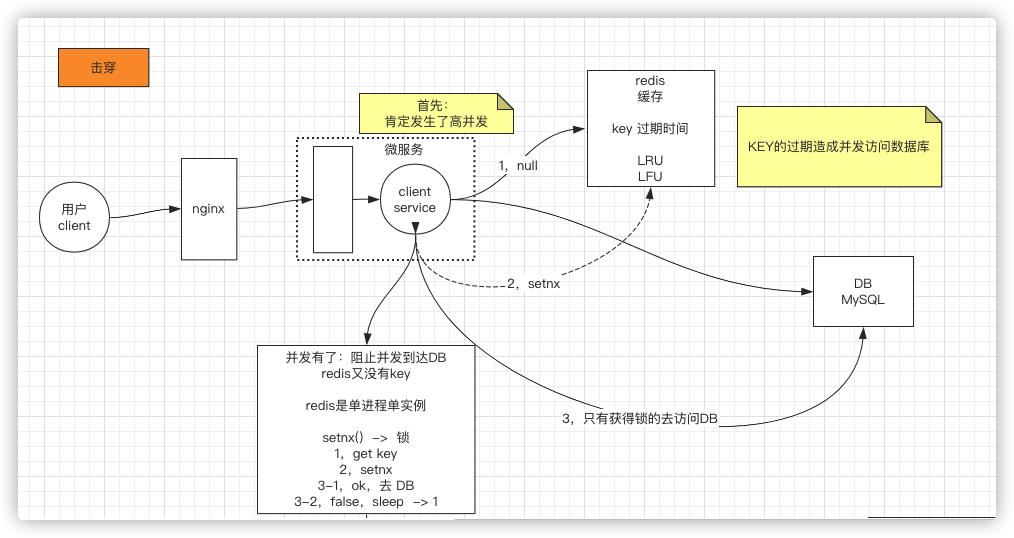
一、击穿
Redis当用来做缓存使用时候,通常用来缓存热数据,同时会有数据库比如mysql存储所有数据
由于一些数据过期或者清理了某些数据,导致之后的请求进来之后直接穿过redis,请求数据库,这就是 击穿
由于KEY的过期造成并发访问数据库,就是击穿
那该如何解决?
首先我们的出发点是阻止并发去到数据库,但是redis中又没有该KEY
1、首先所有请求都get key
2、发现没有key的时候都去setnx
3、只有一个setnx成功(相当于获取一把锁),然后去数据库获取最新的数据并做更新
4、setnx失败的请求,都sleep等待,稍后再次get key(再从第一步开始)
1 | public String get(key) { |
会存在什么问题?
1、如果第一个人挂了(即死锁),那么其他的请求一直在进行上面的过程,这个时候我们可以设置锁的过期时间,当地一个请求挂了,那么其他肯定会有一个又能抢到锁
2、没挂,但是锁超时了。这种情况可以使用多线程来解决,即第一个请求加了一把锁,设置时间为1s,这是服务中的一个线程,那我再加一个线程,每隔半秒去看看前面那个线程的结果取回来了没,如果没有,延长一下第一个线程锁的超时时间
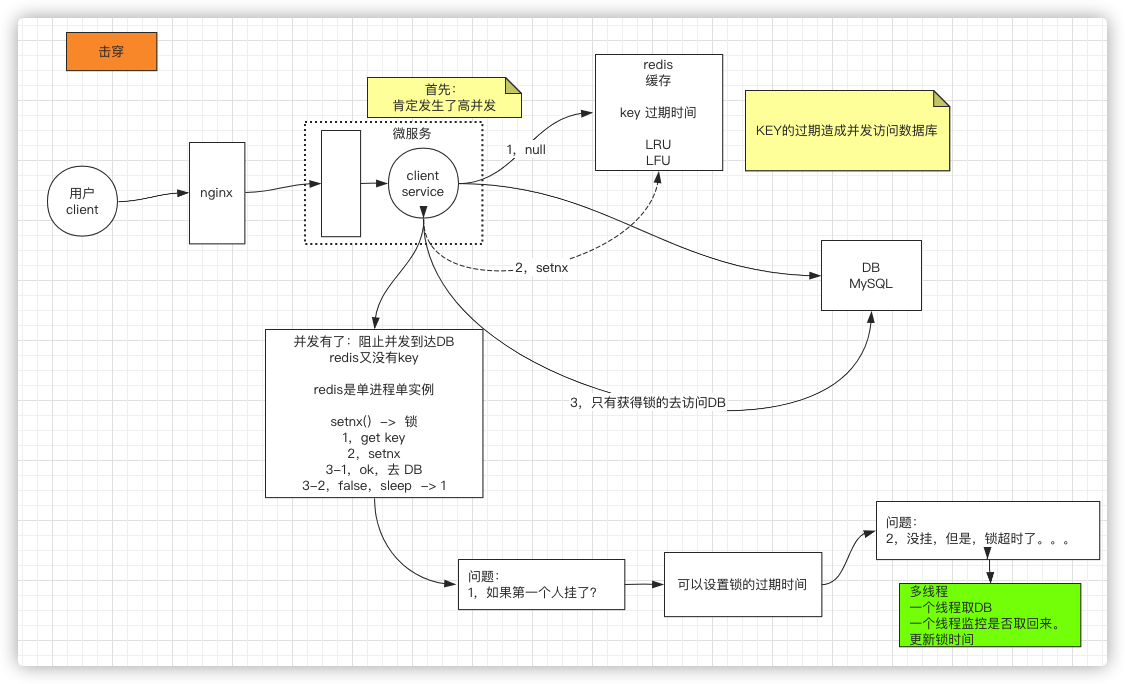
这个时候客户端的代码逻辑成本已经很高了,技术讨论到这个时候就可以了,项目中可能很少这么去做,因为到分布式的情况下,这样实现成本还是很高的,而说这些就是为了引入zookeeper,即因为实现分布式协调很麻烦,所有就有了zookeeper
二、穿透
从业务接收到的查询是系统根本不存在的,比如你们公司的产品库都是电子产品,但是客户端搜的是母婴的,缓存中没有,数据库也没有
缓存穿透 缓存穿透是指缓存和数据库中都没有的数据,而用户不断发起请求,如发起为id为“-1”的数据或id为特别大不存在的数据。这时的用户很可能是攻击者,攻击会导致数据库压力过大。
如何解决
布隆过滤器,具体布隆过滤器在这里说说过
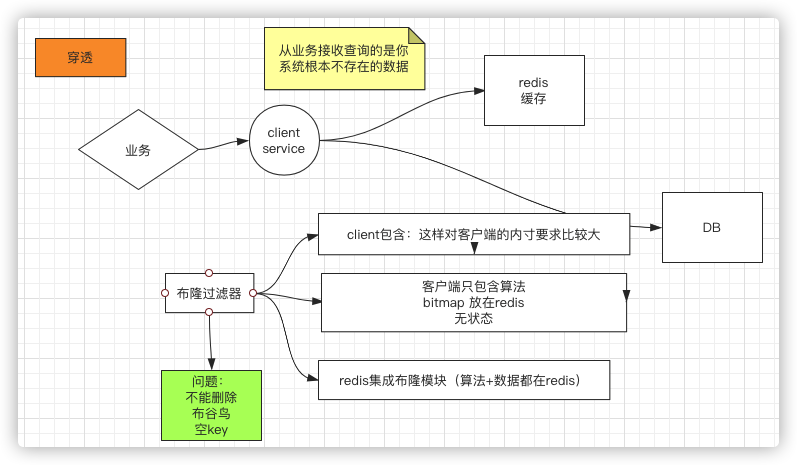
存在的问题
只能新增,不能删除
三、雪崩
雪崩和击穿有点像,
击穿是一个key ,加上高并发,因为过期,穿过去了,不是特别容易发生,但是雪崩设计不好的话,就很容易发生
大量的key同时失效 ,间接造成大量的访问到达数据库
如何解决
均匀分布过期时间
这个需要分两种业务场景讨论:
一种是到某个时间点必须过期,比如0点,另外一种就是时点性无所谓
必须过期:比如12点之前,某贷款的系数是x,过了这个点之后,系数是Y
1、必须过期
强依赖击穿方案
可以前置处理,即在业务层加一个判断,也就是零点延时 (这里的零点是指业务中需要更新的某个时间点)
零点延时:即到某个时间点了,随机sleep几秒,不要让流量过来,更轻盈的解决方案,就是在业务层零点延时一下,然后随机睡个几秒,之后再放过去
这种阻塞其实问题不是很大,后面进来的请求,其实发现前面的数据已经更新完了。有点类似于:
客户端的请求就像一个高速公路,然后走着走着变城镇道路,最后变乡间小路
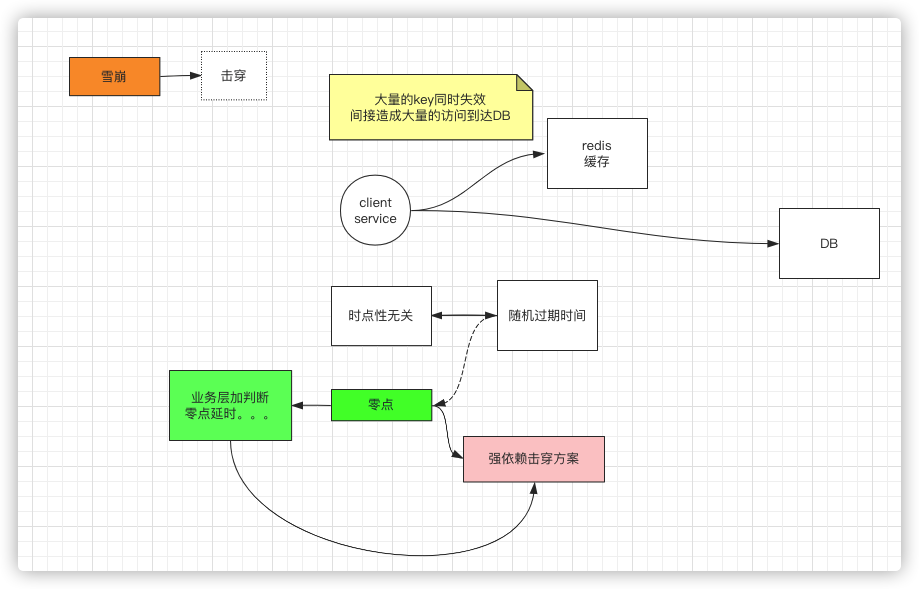
2、时点性无所谓
均匀分布过期时间、随机过期时间
四、分布式锁
根据上面说的,其实我们能想到做分布式锁的办法
1、setnx
2、加过期时间
3、多线程来延长过期时间
Redisson是可以实现上面说的。另外zookeeper也可以,而且用zookeeper做分布式锁是做好的,最容易的,但是是没有redis快的。具体后面分析
一般涉及到分布式锁的话,其实对效率要求,相比准确的来说是没有那么强的,但是准确度和一致性是最强的
五、API
Redis火的其中一个原因就是他支持大部分语言:
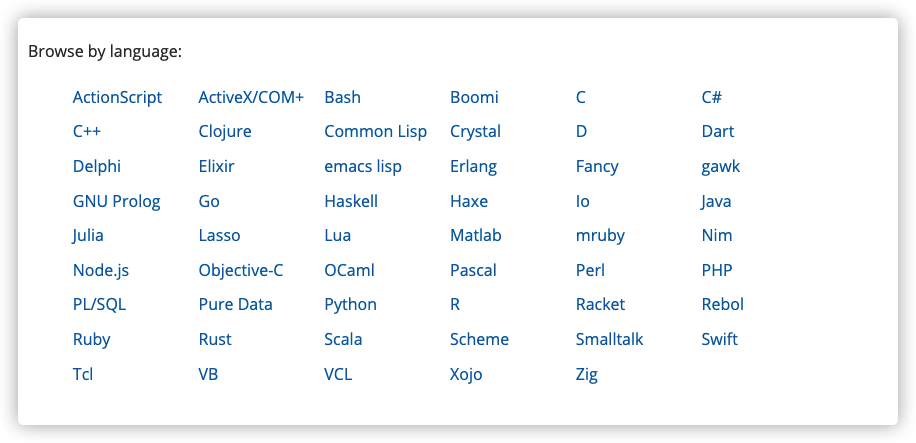
可能存在这种情况,就是写数据的时候是Java,取数据的时候是PHP,这就是Redis的二进制安全,存的是字节数组,这里我们重点看Java语言的,点Java可以看到许多的基于Java的客户端
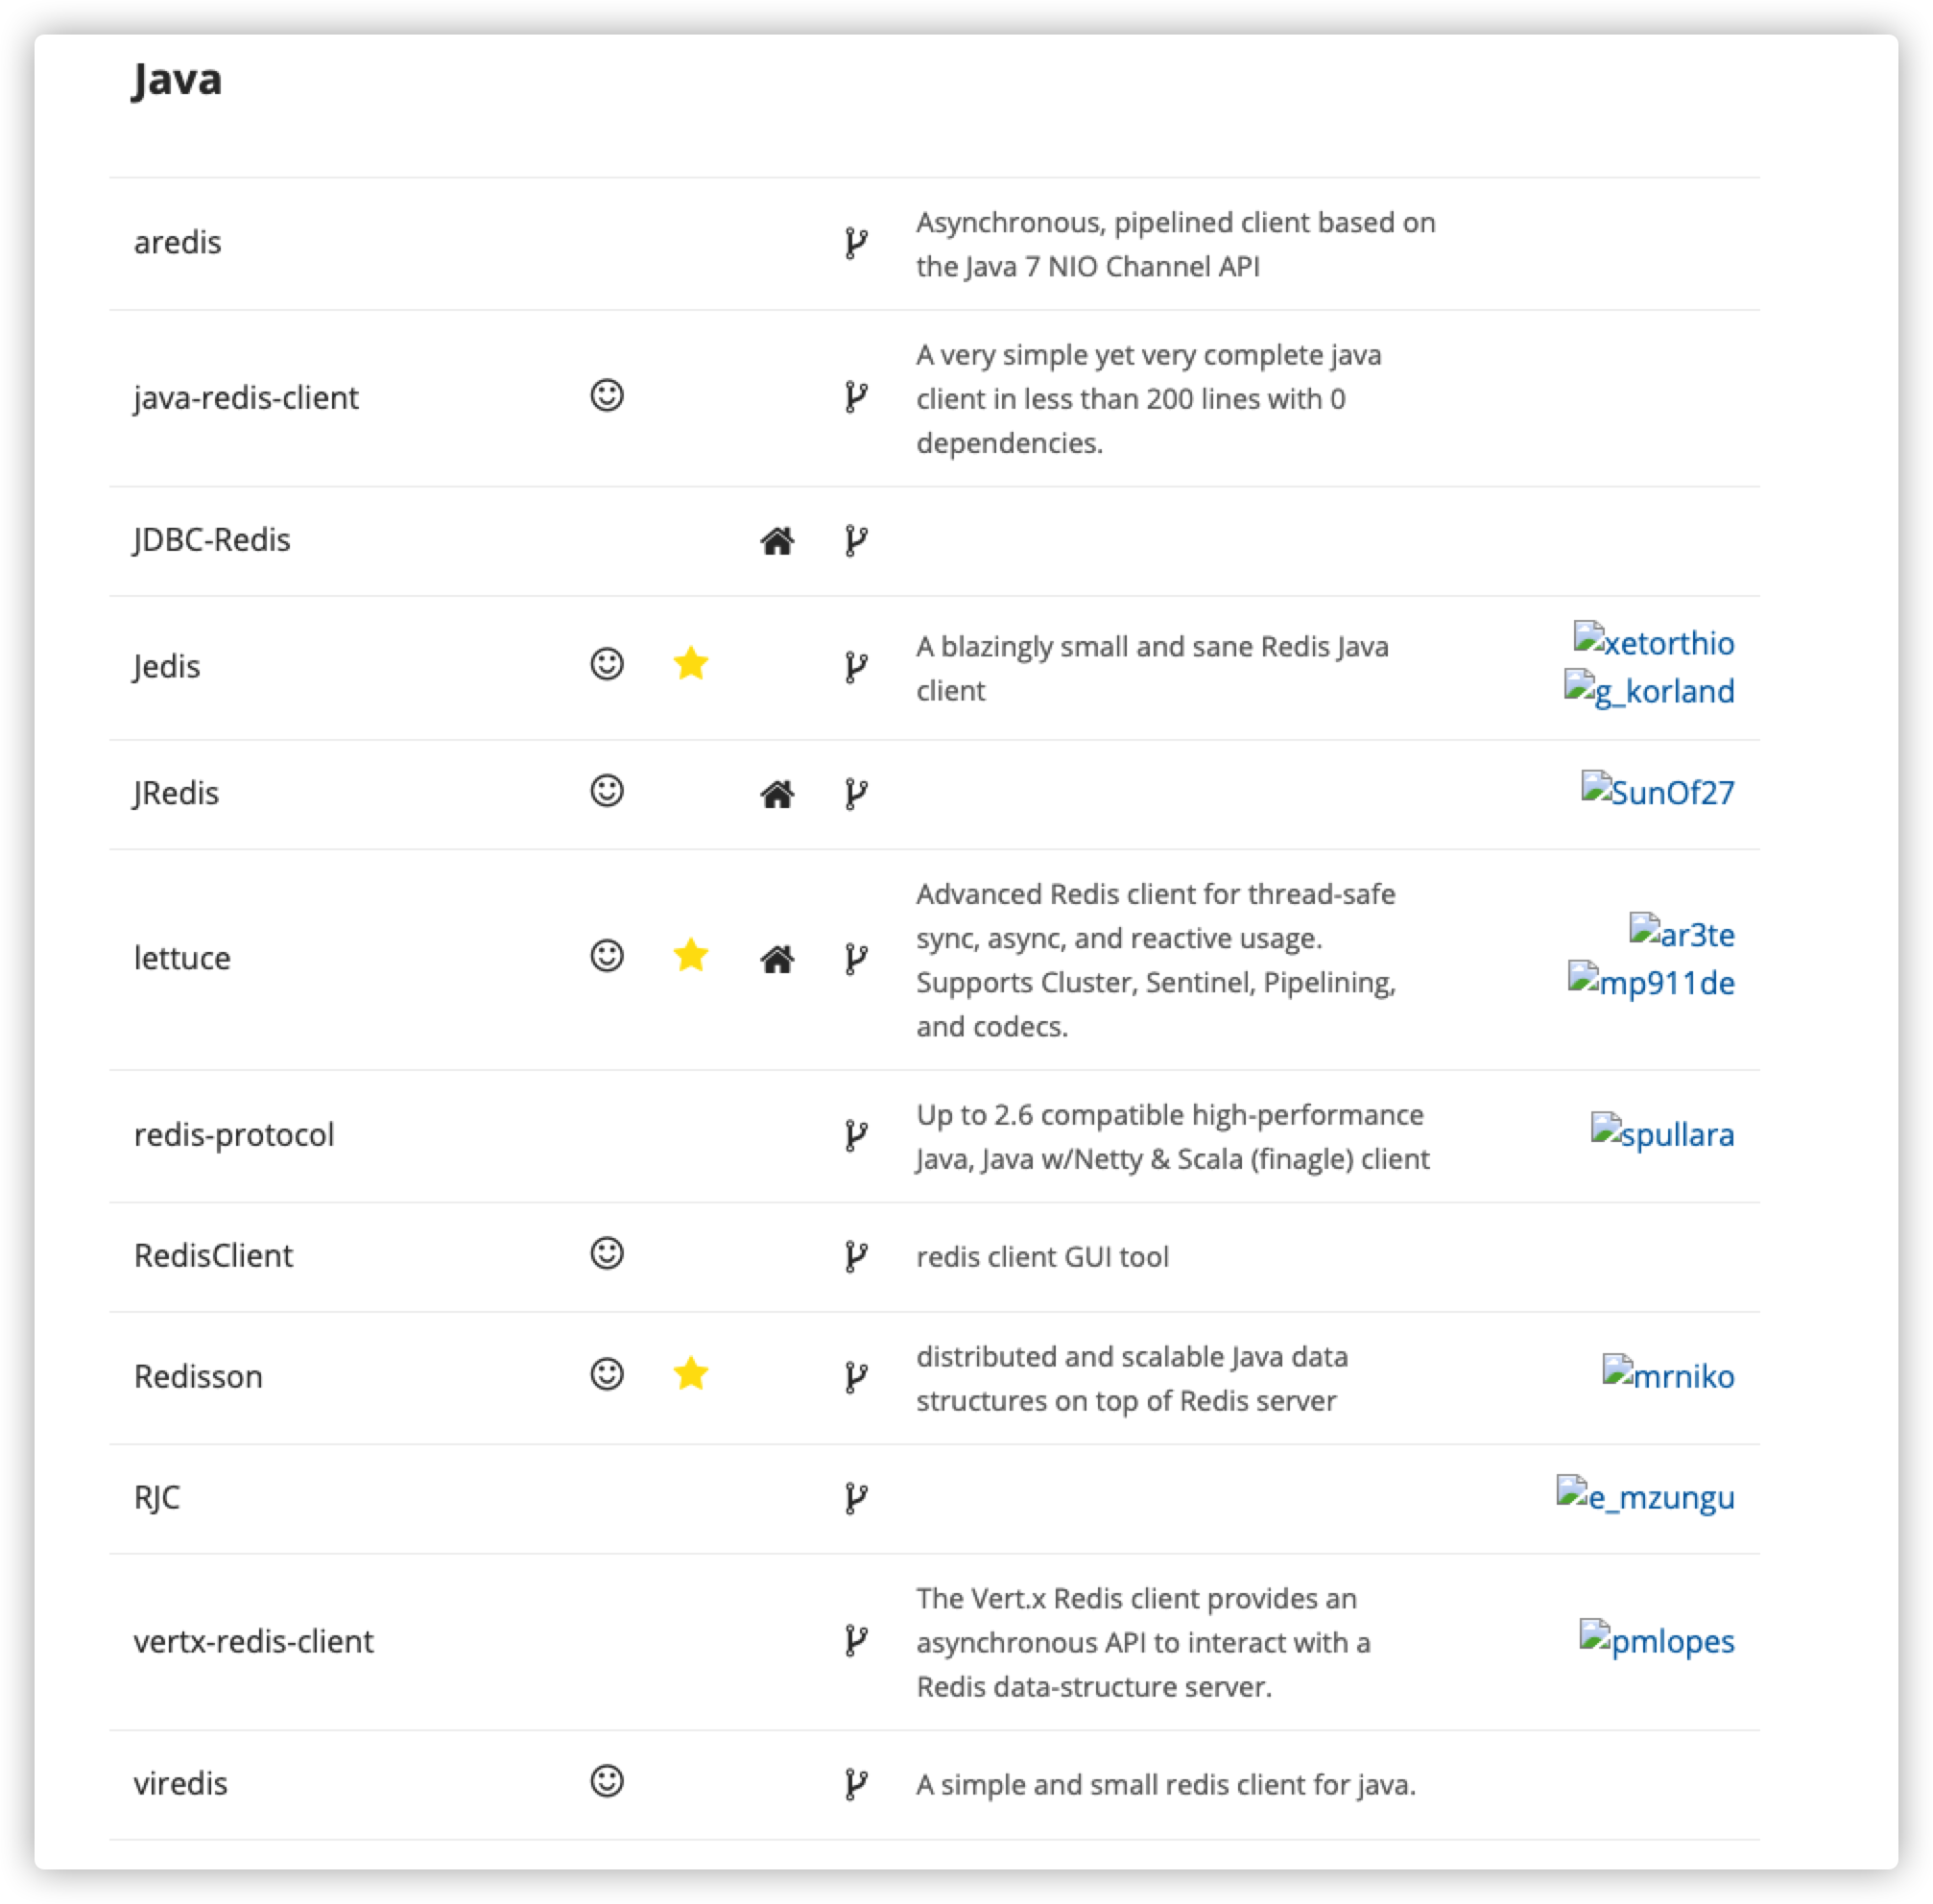
我们主要看常用的jedis、lettuce
1、jedis
首先直接看jedis的Github
使用Maven使用
use it as a maven dependency:
1 | <dependency> |
To use it just:
1 | Jedis jedis = new Jedis("localhost"); |
但是jedis是一个线程不安全的
Redis底层用的是epoll,接受很多的连接,使用多路复用,所有的连接,谁先到谁进。
如何一个客户端只有一个redis线程,那么使用jedis是很方便的,但是如果一个客户端有多个redis线程(或者并发进来了,就会有多个线程),而上面只
new了一个jedis,那么这个jedis给哪一个线程使用呢?也就是说这个jedis是可以被两个线程都访问到的jedis通过创建socket连接连接到redis服务端,然后一个线程开启了事务,并通过jedis发送命令到Redis,如果不加锁,那么另一个客户端也发送命令,但是这个命令会被前面的事务拦住了,那么请求就脏了
那如何解决这个问题?jedis也可以解决这个问题
我们准备一个jedis链接池(pool),每个线程都会拿到一个jedis的连接
注意:是连接池,不是线程池
2、lettuce
Maven使用
找到自己想用的版本
1 | <dependency> |
1 | StatefulRedisConnection<String, String> connection = client.connect(); |
3、Redis在常用框架Spring中的使用
因为我们是常在Spring、Spring Boot中使用Redis,那我们可以看一下这两个的文档
Spring中使用Redis 、Spring Boot中使用Redis
1、在Spring中Redis的连接
在文档中->Redis Requirements,可以看到这样一句话
Spring Redis requires Redis 2.6 or above and Spring Data Redis integrates with Lettuce and Jedis, two popular open-source Java libraries for Redis.
Lettuce
Lettuce is a Netty-based open-source connector supported by Spring Data Redis through the org.springframework.data.redis.connection.lettuce package.
Add the following to the pom.xml files dependencies element:
1 | <dependencies> |
创建一个工厂类:
1 |
|
RedisStandaloneConfiguration这种是简单的Redis,也没有使用哨兵,也没有使用集群
当然可以使用哨兵模式
1 |
|
Jedis
Jedis is a community-driven connector supported by the Spring Data Redis module through the org.springframework.data.redis.connection.jedis package.
Add the following to the pom.xml files dependencies element:
1 | <dependencies> |
In its simplest form, the Jedis configuration looks as follow:
1 |
|
For production use, however, you might want to tweak settings such as the host or password, as shown in the following example:
1 |
|
当然也可以配置哨兵模式
1 | /** |
另外还有主写从读的方式
2、在Spring中Redis的使用
可以参考文档这里
根据文档看到这里面提供了两种层次的使用
a、高层次的-RedisTemplate
用户易于使用
For cases where you need a certain template view, declare the view as a dependency and inject the template. The container automatically performs the conversion, eliminating the opsFor[X] calls, as shown in the following example:
1 |
|
1 | public class Example { |
b、低层次的-RedisConnection
RedisConnection提供了接受和返回二进制值(字节数组)的低级别方法,但是灵活度高
3、数据加工-Serializers
二进制安全的redis,主要介绍数据是怎么处理的
4、Redis在常用框架Spring Boot中的使用
1 |
|
1、引入
我们使用IDEA创建一个项目,同时引入简单的Redis
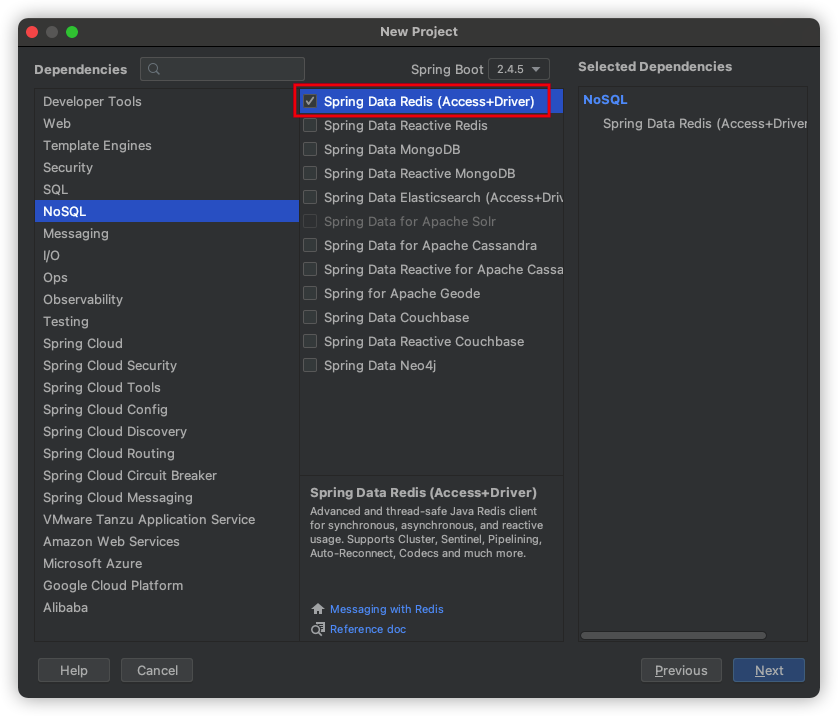
这个项目暂时没有引入web模块,所以这里演示的不是基于网页的,而是基于功能开发的
2、使用
a、高阶API
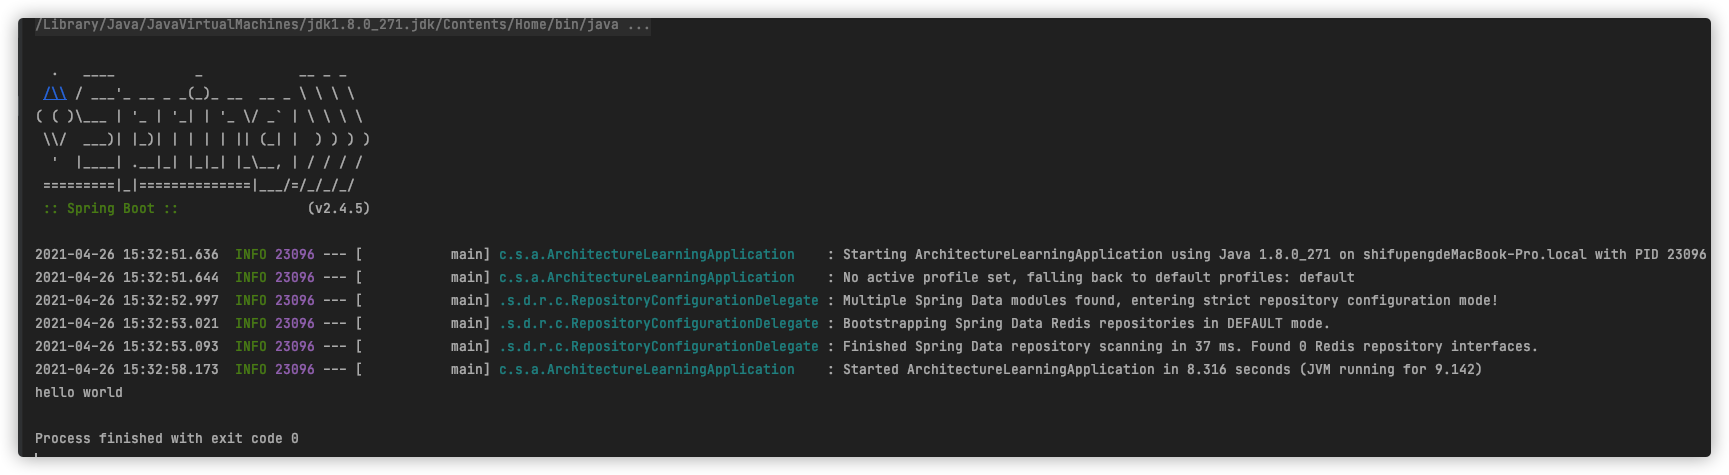
当下面的main方法中的run方法执行的时候,Spring的容器的功能才能实现
1 | package cn.shifpeng.architecturelearning; |
由于没有外界去调用获取bean,所以需要我们手动取,修改如下:
1 | public class ArchitectureLearningApplication { |
1 | package cn.shifpeng.architecturelearning; |
这个时候就可以使用它
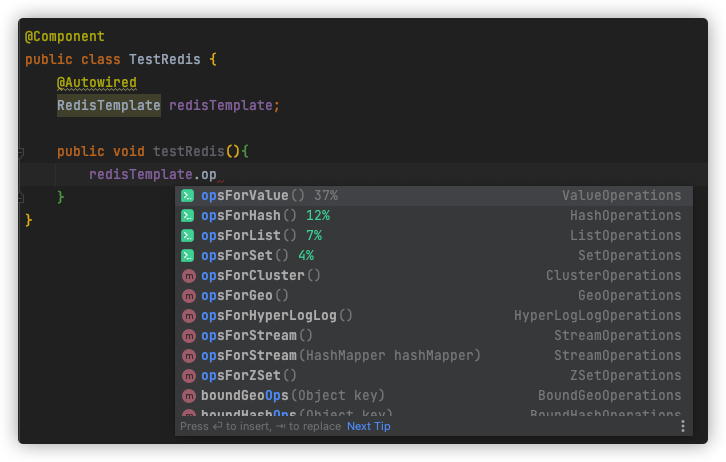
opsForValue及字符串操作
1 |
|
写好了之后,只需要在这里调用这个方法,即可打印
1 | package cn.shifpeng.architecturelearning; |
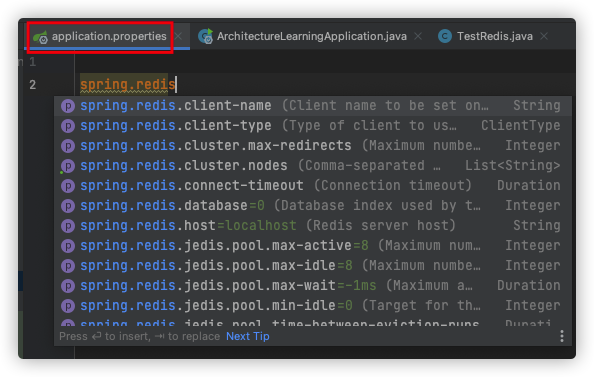
注意:Spring Boot会把各种配置放在配置文件中,如下
我们先去虚拟机中,起一个redis服务
1 | [root@hadoop01 ~]# cd /test/ |
那我们redis的host是多少呢,
1 | [root@hadoop01 ~]# ifconfig |
host是172.16.197.200
所以修改application.properties配置
1 | spring.redis.host=172.16.197.200 |
另外,Redis默认是有安全策略的,默认是禁止远端访问的,可以在redis客户端中查看
2
3
4
5
6
7
8
9
10
11
12
13
14
127.0.0.1:6379> CONFIG GET *
1) "rdbchecksum"
2) "yes"
3) "daemonize"
4) "no"
...
163) "protected-mode"
164) "yes"
...
127.0.0.1:6379> CONFIG GET protected-mode # 也可以直接指定
1) "protected-mode"
2) "yes"
127.0.0.1:6379>我们讲它临时关闭,或者直接去修改配置文件
2
3
OK
127.0.0.1:6379>
然后运行一下:打印出来了
再去redis看看,发现乱码了,这是因为redis是二进制安全的,只存二进制数组,任何客户端连接的时候
1 | 127.0.0.1:6379> KEYS * |
spring中还有一个高阶的API,StringRedisTemplate,将上面的替换
1 |
|
执行之后再看:
1 | 127.0.0.1:6379> KEYS * |
这是因为这里使用高阶API,使用了Java序列化方式的,是需要加一些东西的
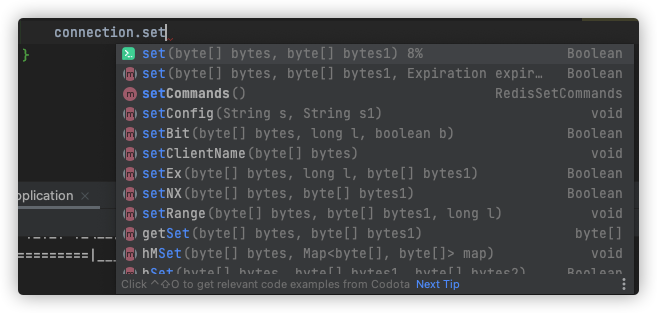
b、低阶API
也可以使用地阶APIRedisConnection
1 |
|
c、Redis序列化
Redis类型中,可以分为两类,一类是单值,一类是复值的,复值就是
hash,hashk->v,而value又可以是k->v比如:
2
3
4
5
6
7
8
9
10
11
12
13
14
15
16
17
public class TestRedis {
RedisTemplate redisTemplate;
//
StringRedisTemplate stringRedisTemplate;
public void testRedis() {
HashOperations<String, Object, Object> hashOperations = stringRedisTemplate.opsForHash();
hashOperations.put("Steven", "name", "shifupeng");
hashOperations.put("Steven", "age", "22");
System.out.println(hashOperations.entries("Steven"));
}
}
//运行结果
//{name=shifupeng, age=22}
2
3
4
5
6
7
8
9
10
11
1) "Hello"
2) "k1"
3) "Steven"
4) "\xac\xed\x00\x05t\x00\x02k1"
127.0.0.1:6379> HGETALL Steven
1) "name"
2) "shifupeng"
3) "age"
4) "22"
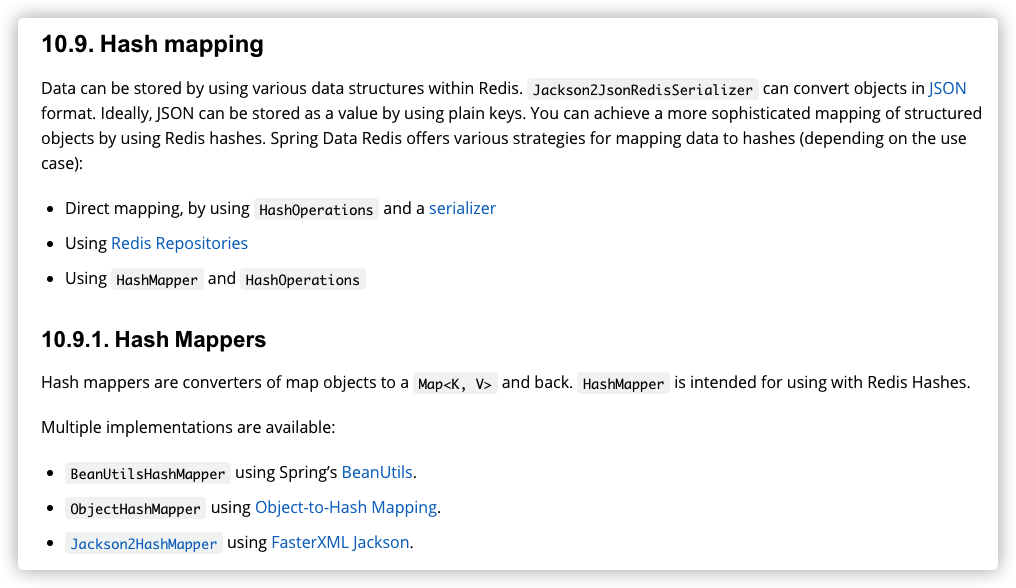
127.0.0.1:6379>如果我有一个对象,要怎么放到hash类型中呢?
文档的这里哈希映射其实有说明
2
3
4
5
6
7
8
9
10
11
12
13
14
15
16
17
18
19
20
21
22
public class Person {
private String name;
private Integer age;
public String getName() {
return name;
}
public void setName(String name) {
this.name = name;
}
public Integer getAge() {
return age;
}
public void setAge(Integer age) {
this.age = age;
}
}
实现:
2
3
4
5
6
7
8
9
10
11
12
13
14
15
16
17
18
19
20
21
22
23
24
25
26
27
28
29
30
31
32
33
34
35
36
37
38
39
40
41
42
43
44
import com.fasterxml.jackson.databind.ObjectMapper;
import org.springframework.beans.factory.annotation.Autowired;
import org.springframework.data.redis.connection.RedisConnection;
import org.springframework.data.redis.core.HashOperations;
import org.springframework.data.redis.core.RedisTemplate;
import org.springframework.data.redis.core.StringRedisTemplate;
import org.springframework.data.redis.hash.Jackson2HashMapper;
import org.springframework.stereotype.Component;
import java.nio.charset.StandardCharsets;
import java.time.Period;
import java.util.Map;
public class TestRedis {
RedisTemplate redisTemplate;
//
StringRedisTemplate stringRedisTemplate;
ObjectMapper objectMapper;//需要引入spring-boot-starter-json的maven包
public void testRedis() {
Person p = new Person();
p.setAge(22);
p.setName("zhangsan");
//因为value种存在整形,导致类型不匹配,所以需要序列化
stringRedisTemplate.setHashValueSerializer(new Jackson2JsonRedisSerializer<Object>(Object.class));
Jackson2HashMapper jackson2HashMapper = new Jackson2HashMapper(objectMapper, true);//第二个参数可以控制里面的子对象页做map映射
//jackson2HashMapper有tomap方法
//value需要的是一个Map
stringRedisTemplate.opsForHash().putAll("Steven01", jackson2HashMapper.toHash(p));
Map map = stringRedisTemplate.opsForHash().entries("Steven01");
Person person = objectMapper.convertValue(map, Person.class);
System.out.println(person.getName());
}
}查看redis:
2
3
4
5
6
7
8
1) "Steven01"
127.0.0.1:6379> HGETALL Steven01
1) "name"
2) "\"zhangsan\""
3) "age"
4) "22"
127.0.0.1:6379>
但是这样写太麻烦了,每次写都需要写序列化等,如何解决
可以通过使用自定义的Template解决
d、自定义的Template
1 |
|
这样就可以在使用的时候不用做序列化操作了
1 | package cn.shifpeng.architecturelearning; |
再次查看,一样的结果
1 | 127.0.0.1:6379> KEYS * |
5、 Redis的发布/订阅
1 | stringRedisTemplate.convertAndSend("channel01", "hello"); //发布 |
如果您喜欢此博客或发现它对您有用,则欢迎对此发表评论。 也欢迎您共享此博客,以便更多人可以参与。 如果博客中使用的图像侵犯了您的版权,请与作者联系以将其删除。 谢谢 !