无论是为了解决redis的高可用问题、还是为了可扩展性、或者是为了维护方便,用一款redis代理都是上佳的选择。在github上有众多开源的redis代理。
一、twemproxy
GitHub地址
1、安装部署
先连接一台机器:然后下载源码
1
2
3
4
5
6
7
8
9
10
[root@hadoop01 ~]# cd /usr/local/ [root@hadoop01 local]# mkdir twemproxy [root@hadoop01 local]# cd twemproxy/ [root@hadoop01 twemproxy]# git clone https://github.com/twitter/twemproxy.git 正克隆到 'twemproxy'... remote: Enumerating objects: 2984, done. remote: Total 2984 (delta 0), reused 0 (delta 0), pack-reused 2984 接收对象中: 100% (2984/2984), 2.12 MiB | 91.00 KiB/s, done. 处理 delta 中: 100% (2061/2061), done. [root@hadoop01 twemproxy]#
在readme中Build->A quick checklist中有这样一句话
1 auto reconf -fvi && ./configure needs auto make and libtool to be installed
所以,在编译安装之前,需要先安装automake、libtool
1 [root@hadoop01 twemproxy]# yum install automake libtool -y
然后根据readme中的教程:
1
2
3
4
5
6
7
8
9
10
11
12
13
14
15
16
17
18
19
20
21
22
23
24
25
26
27
28
29
30
31
32
33
[root@hadoop01 twemproxy]# cd twemproxy/ [root@hadoop01 twemproxy]# ls ChangeLog conf configure.ac contrib Dockerfile LICENSE m4 Makefile.am man notes NOTICE README.md scripts src tests travis.sh [root@hadoop01 twemproxy]# autoreconf -fvi autoreconf: Entering directory `.' autoreconf: configure.ac: not using Gettext autoreconf: running: aclocal --force -I m4 autoreconf: configure.ac: tracing autoreconf: configure.ac: adding subdirectory contrib/yaml-0.1.4 to autoreconf autoreconf: Entering directory `contrib/yaml-0.1.4' autoreconf: configure.ac: not using Autoconf autoreconf: Leaving directory `contrib/yaml-0.1.4' autoreconf: configure.ac: creating directory config autoreconf: running: libtoolize --copy --force libtoolize: putting auxiliary files in AC_CONFIG_AUX_DIR, `config'. libtoolize: copying file `config/ltmain.sh' libtoolize: putting macros in AC_CONFIG_MACRO_DIR, `m4'. libtoolize: copying file `m4/libtool.m4' libtoolize: copying file `m4/ltoptions.m4' libtoolize: copying file `m4/ltsugar.m4' libtoolize: copying file `m4/ltversion.m4' libtoolize: copying file `m4/lt~obsolete.m4' libtoolize: `AC_PROG_RANLIB' is rendered obsolete by `LT_INIT' autoreconf: running: /usr/bin/autoconf --force autoreconf: running: /usr/bin/autoheader --force autoreconf: running: automake --add-missing --copy --force-missing configure.ac:36: installing 'config/config.guess' configure.ac:36: installing 'config/config.sub' configure.ac:16: installing 'config/install-sh' configure.ac:16: installing 'config/missing' src/Makefile.am: installing 'config/depcomp' autoreconf: Leaving directory `.' [root@hadoop01 twemproxy]#
执行完之后,就会发现目录下多了一个configure,然后执行./configure --enable-debug=full,完成之后,执行make,编译完成之后就会有可执行文件。去src目录下,可以看到一个nutcracker
我们顺便来看一下目录下的Scripts文件夹,这里面会有程序的.init,可以看到有一个nutcracker程序的nutcracker.init,打开可以看一下:
1
2
3
4
5
6
7
8
9
10
11
12
13
14
15
16
17
18
19
20
21
22
23
24
25
26
27
28
29
30
31
32
33
34
# ! /bin/sh # # description: Twitter's twemproxy nutcracker # processname: nutcracker # config: /etc/sysconfig/nutcracker # Source function library. . /etc/rc.d/init.d/functions USER="nobody" OPTIONS="-d -c /etc/nutcracker/nutcracker.yml" if [ -f /etc/sysconfig/nutcracker ];then . /etc/sysconfig/nutcracker fi # Check that networking is up. if [ "$NETWORKING" = "no" ] then exit 0 fi RETVAL=0 prog="nutcracker" start () { echo -n $"Starting $prog: " #Test the config before start. daemon --user ${USER} ${prog} $OPTIONS -t >/dev/null 2>&1 RETVAL=$? if [ $RETVAL -ne 0 ] ; then ... ...
我们可以看到其实就是服务的启动和停止脚本
/etc/init.d下会有一些脚本,包含许多系统各种服务的启动和停止脚本,即做一些软件的服务,另外,用service命令可执行init.d目录中相应服务的脚本
/etc/init.d是指向/etc/rc.d/init.d的软连接
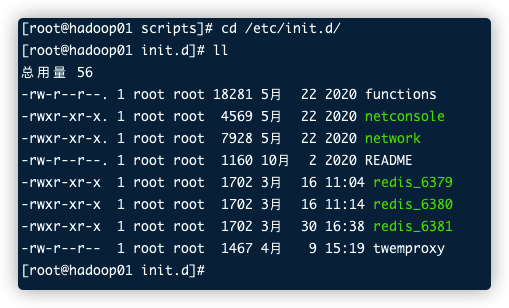
那我们把这个文件拷贝过来,并给它重新起一个服务名
1
2
3
4
5
6
7
8
9
10
11
12
13
[root@hadoop01 scripts]# cp nutcracker.init /etc/init.d/twemproxy [root@hadoop01 scripts]# cd /etc/init.d/ [root@hadoop01 init.d]# ll 总用量 56 -rw-r--r--. 1 root root 18281 5月 22 2020 functions -rwxr-xr-x. 1 root root 4569 5月 22 2020 netconsole -rwxr-xr-x. 1 root root 7928 5月 22 2020 network -rw-r--r--. 1 root root 1160 10月 2 2020 README -rwxr-xr-x 1 root root 1702 3月 16 11:04 redis_6379 -rwxr-xr-x 1 root root 1702 3月 16 11:14 redis_6380 -rwxr-xr-x 1 root root 1702 3月 30 16:38 redis_6381 -rw-r--r-- 1 root root 1467 4月 9 15:19 twemproxy [root@hadoop01 init.d]#
虽然拷贝过去了,但是文件的颜色还没有变绿,说明文件还不能执行:
1 [root@hadoop01 init.d]# chmod +x twemproxy
这样文件颜色就变绿了,但是还没好,因为这个init文件中的一些东西还需要准备,比如:
1 OPTIONS ="-d -c /etc/nutcracker/nutcracker.yml"
那就需要在上面的路径下有一个文件:
然后渠道源码目录下,把文件拷贝过来
1
2
3
4
5
6
7
8
9
10
11
12
13
14
[root@hadoop01 ~]# cd /usr/local/twemproxy/twemproxy/conf [root@hadoop01 conf]# ll 总用量 12 -rw-r--r-- 1 root root 209 4月 8 17:35 nutcracker.leaf.yml -rw-r--r-- 1 root root 151 4月 8 17:35 nutcracker.root.yml -rw-r--r-- 1 root root 1301 4月 8 17:35 nutcracker.yml [root@hadoop01 conf]# cp ./* /etc/nutcracker/ [root@hadoop01 conf]# cd /etc/nutcracker/ [root@hadoop01 nutcracker]# ll 总用量 12 -rw-r--r-- 1 root root 209 4月 9 15:28 nutcracker.leaf.yml -rw-r--r-- 1 root root 151 4月 9 15:28 nutcracker.root.yml -rw-r--r-- 1 root root 1301 4月 9 15:28 nutcracker.yml [root@hadoop01 nutcracker]#
这个就配置好了,接着看,twemproxy文件中下面还有个prog="nutcracker",指定这个程序,但是没有路径,那么就是在它的环境变量path的基本目录下,比如根目录下的bin、sbin、/usr/bin目录,因此把刚才编译完的可执行程序拷贝一份放到/usr/bin下面
1
2
[root@hadoop01 twemproxy]# cd /usr/local/twemproxy/twemproxy/src/ [root@hadoop01 src]# cp nutcracker /usr/bin/
这个时候就可以在系统的任何地方直接使用 service twemproxy start、 service twemproxy stop等命令。
2、配置
但是我们还没有修改twemproxy代理的配置文件,打开看看:
1
2
3
4
5
6
7
8
9
[root@hadoop01 src]# cd /etc/nutcracker/ [root@hadoop01 nutcracker]# ll 总用量 12 -rw-r--r-- 1 root root 209 4月 9 15:28 nutcracker.leaf.yml -rw-r--r-- 1 root root 151 4月 9 15:28 nutcracker.root.yml -rw-r--r-- 1 root root 1301 4月 9 15:28 nutcracker.yml [root@hadoop01 nutcracker]# cp nutcracker.yml nutcracker.yml.bak [root@hadoop01 nutcracker]# vi nutcracker.yml [root@hadoop01 nutcracker]#
这个时候就可以按照github上的README.md -Configuration 来修改了,配置文件是这样的:
1
2
3
4
5
6
7
8
9
10
11
alpha: listen: 127.0 .0 .1 :22121 client_connections: 10 . hash: fnv1a_64 distribution: ketama auto_eject_hosts: true redis: true server_retry_timeout: 2000 server_failure_limit: 1 servers: - 127.0 .0 .1 :6379:1
我们只需要监听一个,负载两个redis就可以了
1
2
3
4
5
6
7
8
9
10
11
alpha: listen: 127.0 .0 .1 :22121 hash: fnv1a_64 distribution: ketama auto_eject_hosts: true redis: true server_retry_timeout: 2000 server_failure_limit: 1 servers: - 127.0 .0 .1 :6379:1 - 127.0 .0 .1 :6380:1
3、使用
先起两个临时的实例,既然是临时的,就先给这两个实例创建两个文件夹(这样就会拿当前目录作为它的持久化目录)
1 2 3 4 5 6 7 [root@hadoop01 nutcracker]# cd / [root@hadoop01 /]# mkdir data [root@hadoop01 /]# cd data/ [root@hadoop01 data]# mkdir 6379 [root@hadoop01 data]# mkdir 6380 [root@hadoop01 data]#
然后分别在6379、6380中启动两个实例(记得先把之前起的关掉):
1
2
3
4
5
6
7
8
[root@hadoop01 data]# ps -fe | grep redis root 2944 1 0 4月07 ? 00:19:15 redis-server 127.0.0.1:6380 root 2950 1 0 4月07 ? 00:20:11 redis-server 127.0.0.1:6381 root 3016 1 1 4月07 ? 00:42:28 redis-server *:26379 [sentinel] root 3084 1 1 4月07 ? 00:42:20 redis-server *:26380 [sentinel] root 3150 1 1 4月07 ? 00:42:19 redis-server *:26381 [sentinel] root 12263 12180 0 16:00 pts/3 00:00:00 grep --color=auto redis [root@hadoop01 data]# kill -9 2944 2950 3016 3084 3150
1
2
[root@hadoop01 data]# cd 6379/ [root@hadoop01 6379]# redis-server --port 6379
1
2
[root@hadoop01 data]# cd 6380/ [root@hadoop01 6380]# redis-server --port 6380
启动代理服务:
1
2
3
4
[root@hadoop01 ~]# service twemproxy start Reloading systemd: [ 确定 ] Starting twemproxy (via systemctl): [ 确定 ] [root@hadoop01 ~]#
现在我们连接代理使用
1
2
3
4
5
6
7
8
[root@hadoop01 ~]# redis-cli -p 22121 127.0.0.1:22121> set k1 1111 OK 127.0.0.1:22121> set k2 2222 OK 127.0.0.1:22121> get k1 "1111" 127.0.0.1:22121>
那么数据写到哪里去了,可以直接跳过代理连接redis查看
1
2
3
4
[root@hadoop01 ~]# redis-cli -p 6379 127.0.0.1:6379> keys * (empty array) 127.0.0.1:6379>
1
2
3
4
5
[root@hadoop01 ~]# redis-cli -p 6380 127.0.0.1:6380> keys * 1) "k2" 2) "k1" 127.0.0.1:6380>
我们发现都存到6380里面了,这其实是代理中的算法分配的问题,我们在通过redis代理客户端设置一个值:
1
2
3
127.0.0.1:22121> set 1 323123 OK 127.0.0.1:22121>
再看6379:
1
2
3
127.0.0.1:6379> keys * 1) "1" 127.0.0.1:6379>
4、注意
需要注意的是,通过代理,有一些命令是无法使用的:
keys *
1
2
3
127.0.0.1:22121> keys * Error: Server closed the connection 127.0.0.1:22121>
数据都分治了,所以命令不能用的
这样的还有watch、事务multi
二、predixy
GitHub地址
1、安装
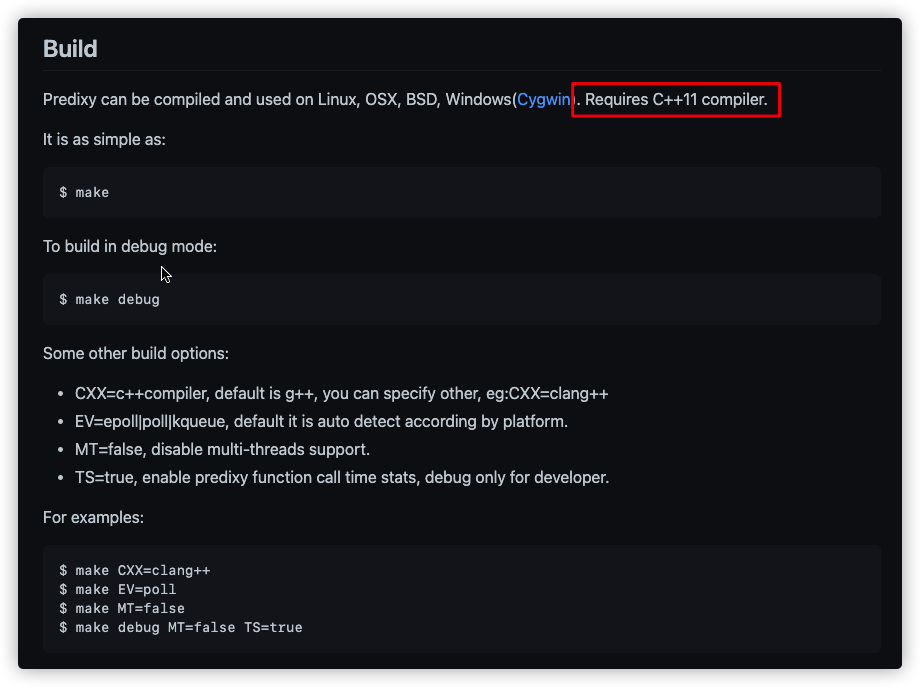
查看Readme的Build,看着编译安装很简单,但是注意有一句话
但如果系统的Centos6版本,是没有11版本的编译器的,要升级挺麻烦的,所以直接拿编译好的直接使用:
1
2
3
4
[root@hadoop01 /]# mkdir soft [root@hadoop01 /]# cd soft/ [root@hadoop01 soft]# wget https://github.com/joyieldInc/predixy/releases/download/1.0.5/predixy-1.0.5-bin-amd64-linux.tar.gz ...
1
2
3
4
5
6
7
[root@hadoop01 soft]# tar xf predixy-1.0.5-bin-amd64-linux.tar.gz [root@hadoop01 soft]# ll 总用量 5924 drwxr-xr-x 6 501 501 4096 10月 20 2018 predixy-1.0.5 -rw-r--r-- 1 root root 6061804 10月 20 2018 predixy-1.0.5-bin-amd64-linux.tar.gz [root@hadoop01 soft]#
然后继续按照github上面的提示 配置使用
2、配置
先看一下配置文件
1
2
3
4
5
6
7
8
9
10
11
12
13
[root@hadoop01 predixy-1.0.5]# cd conf/ [root@hadoop01 conf]# ll 总用量 36 -rw-rw-r-- 1 501 501 2395 10月 20 2018 auth.conf -rw-rw-r-- 1 501 501 1041 10月 20 2018 cluster.conf -rw-rw-r-- 1 501 501 3426 10月 20 2018 command.conf -rw-rw-r-- 1 501 501 781 10月 20 2018 dc.conf -rw-rw-r-- 1 501 501 2121 10月 20 2018 latency.conf -rw-rw-r-- 1 501 501 2547 10月 20 2018 predixy.conf -rw-rw-r-- 1 501 501 1421 10月 20 2018 sentinel.conf -rw-rw-r-- 1 501 501 2016 10月 20 2018 standalone.conf -rw-rw-r-- 1 501 501 98 10月 20 2018 try.conf [root@hadoop01 conf]# vi predixy.conf
a、predixy.conf
我们先配置一下 predixy.conf,有这么几个配置需要修改
1
2
3
4
5
6
# Bind 127.0.0.1:7617 # 打开注释 # # Include cluster.conf Include sentinel.conf # 先打开哨兵模式(哨兵模式和cluster模式不能同时使用,只能使用一种) # Include try.conf
b、sentinel.conf
修改哨兵的配置vi sentinel.conf :复制一份#SentinelServerPool
tips:(常识)
1、光标放在下面的第二行最前面,然后按住shift,输入:,开启冒号模式,再按.,代表光标位置,再按,$代表到最后一行,然后按下y,代表复制的意思,然后回车。这样,这一段就复制完了,最后把光标移动道最后,按下np即可粘贴
2、另外还需要把复制的内容注释去掉,依然是光标停留在复制内容的开始,然后输入:,开启冒号模式,再按.,代表光标位置,再按,$代表到最后一行,然后按下s,然后把#替换成什么都没有,即/#//,完整的就是:.,$s/#//,然后回车
1
2
3
4
5
6
7
8
9
10
11
12
13
14
15
16
17
18
19
20
21
22
23
24
25
# # SentinelServerPool { # Databases 16 # Hash crc16 # HashTag "{}" # Distribution modula # MasterReadPriority 60 # StaticSlaveReadPriority 50 # DynamicSlaveReadPriority 50 # RefreshInterval 1 # ServerTimeout 1 # ServerFailureLimit 10 # ServerRetryTimeout 1 # KeepAlive 120 # Sentinels { # + 10.2.2.2:7500 # + 10.2.2.3:7500 # + 10.2.2.4:7500 # } # Group shard001 { # } # Group shard002 { # } # }
比如配置如下:
1
2
3
4
5
6
7
8
9
10
11
12
13
14
15
16
17
18
19
20
21
22
23
SentinelServerPool { Databases 16 Hash crc16 HashTag "{}" Distribution modula MasterReadPriority 60 StaticSlaveReadPriority 50 DynamicSlaveReadPriority 50 RefreshInterval 1 ServerTimeout 1 ServerFailureLimit 10 ServerRetryTimeout 1 KeepAlive 120 Sentinels { # 哨兵的ip+端口 + 127.0.0.1:26379 + 127.0.0.1:26380 + 127.0.0.1:26381 } Group mymaster01 { # 哨兵配置文件中监控的master的名称 } Group mymaster02 { # 如果监控的是两套主从复制,那就要再加一个group,Distribution指定的模型就会在这里列出的两套主从做hash+取模,然后放到计算后的里面 } }
3、使用
之前我们做过一些哨兵的配置
1
2
3
4
5
6
7
8
9
10
[root@hadoop01 conf]# cd /test/ [root@hadoop01 test]# ll 总用量 252 -rw-r--r-- 1 root root 81553 3月 30 17:27 6379.conf -rw-r--r-- 1 root root 81635 4月 2 17:44 6380.conf -rw-r--r-- 1 root root 81610 4月 2 17:44 6381.conf -rw-r--r-- 1 root root 602 4月 2 17:44 sentinel_6379.conf -rw-r--r-- 1 root root 602 4月 2 17:44 sentinel_6380.conf -rw-r--r-- 1 root root 602 4月 2 17:44 sentinel_6381.conf [root@hadoop01 test]#
a、修改哨兵配置,监控两台主从
这里我们把哨兵的配置文件做一些修改,比如sentinel_6379.conf,修改节点的端口号为36381,再增加一个46381(到时候我们需要指定端口起几个服务)
1
2
3
4
# 把文件中不用的先删掉,留下下面的两行 port 26379 sentinel monitor mymaster01 127.0.0.1 36379 2 sentinel monitor mymaster02 127.0.0.1 46379 2
注意这里的名称跟上面predixy中sentinel.conf的配置中group指定是必须是一样的
同理:sentinel_6380.conf,除了哨兵自己的端口不同之外,其他都一样
1
2
3
4
# 把文件中不用的先删掉,留下下面的两行 port 26380 sentinel monitor mymaster01 127.0.0.1 36379 2 sentinel monitor mymaster02 127.0.0.1 46379 2
1
2
3
4
# 把文件中不用的先删掉,留下下面的两行 port 26381 sentinel monitor mymaster01 127.0.0.1 36379 2 sentinel monitor mymaster02 127.0.0.1 46379 2
所以这个时候应该有两套主从,分别是363xx,其中36379是主;463xx,其中46379是主
b、启动哨兵
1 [root@hadoop01 test]# redis-server sentinel_6379.conf --sentinel
1
2
[root@hadoop01 ~]# cd /test/ [root@hadoop01 test]# redis-server sentinel_6380.conf --sentinel
1
2
[root@hadoop01 ~]# cd /test/ [root@hadoop01 test]# redis-server sentinel_6381.conf --sentinel
c、启动两对主从解节点
因为临时为了演示,所以单独创建文件夹
1
2
3
4
5
[root@hadoop01 ~]# cd /test/ [root@hadoop01 test]# mkdir 36379 [root@hadoop01 test]# mkdir 36380 [root@hadoop01 test]# mkdir 46380 [root@hadoop01 test]# mkdir 46379
启动第一个主
1
2
[root@hadoop01 test]# cd 36379/ [root@hadoop01 36379]# redis-server --port 36379
启动第一个主对应的从
1
2
[root@hadoop01 test]# cd 36380 [root@hadoop01 36380]# redis-server --port 36380 --replicaof 127.0.0.1 36379
再起另一对:
先起主:
1
2
3
[root@hadoop01 ~]# cd /test/ [root@hadoop01 test]# cd 46379/ [root@hadoop01 46379]# redis-server --port 46379
启从:
1
2
3
[root@hadoop01 ~]# cd /test/ [root@hadoop01 test]# cd 46380/ [root@hadoop01 46380]# redis-server --port 46380 --replicaof 127.0.0.1 46379
d、 启动predixy代理
1
2
3
4
5
6
7
8
9
10
11
12
[root@hadoop01 test]# cd /soft/predixy-1.0.5/bin/ [root@hadoop01 bin]# ./predixy ../conf/predixy.conf 2021-04-12 17:04:58.409822 N Proxy.cpp:112 predixy listen in 127.0.0.1:7617 2021-04-12 17:04:58.410092 N Proxy.cpp:143 predixy running with Name:PredixyExample Workers:1 2021-04-12 17:04:58.412247 N Handler.cpp:454 h 0 create connection pool for server 127.0.0.1:26381 2021-04-12 17:04:58.413050 N ConnectConnectionPool.cpp:42 h 0 create server connection 127.0.0.1:26381 5 2021-04-12 17:04:58.413144 N Handler.cpp:454 h 0 create connection pool for server 127.0.0.1:26380 2021-04-12 17:04:58.413158 N ConnectConnectionPool.cpp:42 h 0 create server connection 127.0.0.1:26380 6 2021-04-12 17:04:58.414741 N StandaloneServerPool.cpp:422 sentinel server pool group mymaster01 create master server 127.0.0.1:36379 2021-04-12 17:04:58.414760 N StandaloneServerPool.cpp:472 sentinel server pool group mymaster01 create slave server 127.0.0.1:36380 2021-04-12 17:04:58.414771 N StandaloneServerPool.cpp:472 sentinel server pool group mymaster02 create slave server 127.0.0.1:46380 2021-04-12 17:04:58.414784 N StandaloneServerPool.cpp:422 sentinel server pool group mymaster02 create master server 127.0.0.1:46379
根据日志就可以看到两对主从都发现了,同时predixy监听的是7617端口
e、客户端连接代理
1
2
3
4
5
[root@hadoop01 ~]# redis-cli -p 7617 127.0.0.1:7617> set k1 aaaa OK 127.0.0.1:7617> get k1 "aaaa"
这个时候我们看下数据落在哪里了,查看两个主
1
2
3
4
[root@hadoop01 ~]# redis-cli -p 36379 127.0.0.1:36379> keys * 1) "k1" 127.0.0.1:36379>
1
2
3
4
[root@hadoop01 ~]# redis-cli -p 46379 127.0.0.1:46379> keys * 1) "k2" 127.0.0.1:46379>
使用hash_tag
1
2
3
4
5
127.0.0.1:7617> set {goods}k1 asdsadasdas OK 127.0.0.1:7617> set {goods}k2 5h5g5h5h5h5 OK 127.0.0.1:76
1
2
3
4
5
6
[root@hadoop01 ~]# redis-cli -p 36379 127.0.0.1:36379> keys * 1) "{goods}k2" 2) "k1" 3) "{goods}k1" 127.0.0.1:36379>
1
2
3
127.0.0.1:7617> WATCH {goods}k1 (error) ERR forbid transaction in current server pool 127.0.0.1:7617>
因为上面配置了两套主从,数据被分治了,所以会直接报错。
但是predixy说支持事务,即只支持单个Group
所以:
1
2
3
[root@hadoop01 ~]# cd /soft/predixy-1.0.5/conf/ [root@hadoop01 conf]# vi sentinel.conf [root@hadoop01 conf]#
1
2
3
4
5
6
Group mymaster01 { } # Group mymaster02 { # }
注释掉Group mymaster02,这个时候,重新启动predixy,这个时候数据就只会往第一个主从中写了
1
2
3
4
5
6
7
8
9
[root@hadoop01 bin]# ./predixy ../conf/predixy.conf 2021-04-12 17:22:54.165155 N Proxy.cpp:112 predixy listen in 127.0.0.1:7617 2021-04-12 17:22:54.165271 N Proxy.cpp:143 predixy running with Name:PredixyExample Workers:1 2021-04-12 17:22:54.165778 N Handler.cpp:454 h 0 create connection pool for server 127.0.0.1:26381 2021-04-12 17:22:54.166242 N ConnectConnectionPool.cpp:42 h 0 create server connection 127.0.0.1:26381 5 2021-04-12 17:22:54.166929 N Handler.cpp:454 h 0 create connection pool for server 127.0.0.1:26380 2021-04-12 17:22:54.166952 N ConnectConnectionPool.cpp:42 h 0 create server connection 127.0.0.1:26380 6 2021-04-12 17:22:54.170039 N StandaloneServerPool.cpp:472 sentinel server pool group mymaster01 create slave server 127.0.0.1:36380 2021-04-12 17:22:54.170068 N StandaloneServerPool.cpp:422 sentinel server pool group mymaster01 create master server 127.0.0.1:36379
这个时候也就只能发现一组的主从了,
这个时候使用Watch、事务等就没问题了
f、主节点挂了
如果主节点挂了,哨兵会根据配置的时间,进行投票。选举出新的主,这个过程对客户端来说是无感知的,这里就不进行演示了
挂掉36379节点,下面是哨兵的日志,可以看出:
1
2
3
4
5
6
7
8
9
1528:X 12 Apr 2021 17:35:46.683 # +sdown master mymaster01 127.0.0.1 36379 1528:X 12 Apr 2021 17:35:46.723 # +new-epoch 1 1528:X 12 Apr 2021 17:35:46.725 # +vote-for-leader d008b1f4dda68f2cd7b937208cab3c3501f9407a 1 1528:X 12 Apr 2021 17:35:46.767 # +odown master mymaster01 127.0.0.1 36379 #quorum 3/2 1528:X 12 Apr 2021 17:35:46.770 # Next failover delay: I will not start a failover before Mon Apr 12 17:41:47 2021 1528:X 12 Apr 2021 17:35:48.552 # +config-update-from sentinel d008b1f4dda68f2cd7b937208cab3c3501f9407a 127.0.0.1 26381 @ mymaster01 127.0.0.1 36379 1528:X 12 Apr 2021 17:35:48.552 # +switch-master mymaster01 127.0.0.1 36379 127.0.0.1 36380 1528:X 12 Apr 2021 17:35:48.552 * +slave slave 127.0.0.1:36379 127.0.0.1 36379 @ mymaster01 127.0.0.1 36380
客户端依然可以获取到数据
三、Redis Cluster(集群)(Redis自身的集群)
期望:Redis可以组建一套无主模型的多节点的cluster,每个节点认领一些槽位
那么引出问题:
需要启动几台?每台分配哪些槽位?等等
redis有一套脚本可供演练 使用:
1
2
3
4
5
6
[root@hadoop01 test]# cd /usr/local/redis-6.0.0/utils/create-cluster/ [root@hadoop01 create-cluster]# ll 总用量 8 -rwxrwxr-x 1 root root 2694 4月 30 2020 create-cluster -rw-rw-r-- 1 root root 1436 4月 30 2020 README [root@hadoop01 create-cluster]#
其中RAEADME中会给出步骤:
1
2
3
4
5
6
7
8
9
10
11
12
13
14
15
16
17
18
19
20
21
22
23
24
25
26
27
28
Create-custer is a small script used to easily start a big number of Redis instances configured to run in cluster mode. Its main goal is to allow manual testing in a condition which is not easy to replicate with the Redis cluster unit tests, for example when a lot of instances are needed in order to trigger a given bug. The tool can also be used just to easily create a number of instances in a Redis Cluster in order to experiment a bit with the system. USAGE --- To create a cluster, follow these steps: 1. Edit create-cluster and change the start / end port, depending on thenumber of instances you want to create. 2. Use "./create-cluster start" in order to run the instances.3. Use "./create-cluster create" in order to execute redis-cli --cluster create, so thatan actual Redis cluster will be created. (If you're accessing your setup via a local container, ensure that the CLUSTER_HOST value is changed to your local IP) 4. Now you are ready to play with the cluster. AOF files and logs for each instances are created in the current directory. In order to stop a cluster: 1. Use "./create-cluster stop" to stop all the instances. After you stopped the instances you can use "./create-cluster start" to restart them if you change your mind. 2. Use "./create-cluster clean" to remove all the AOF / log files to restart with a clean environment. Use the command "./create-cluster help" to get the full list of features.
1、启动节点
根据create-cluster中的配置,会启动6个节点
1
2
3
4
5
6
7
8
[root@hadoop01 create-cluster]# ./create-cluster start Starting 30001 Starting 30002 Starting 30003 Starting 30004 Starting 30005 Starting 30006 [root@hadoop01 create-cluster]#
2、分配槽位
1
2
3
4
5
6
7
8
9
10
11
12
13
14
15
16
17
18
19
20
21
22
23
24
25
26
27
28
29
30
31
32
33
34
35
36
37
38
39
40
41
42
43
44
45
46
47
48
49
50
51
52
[root@hadoop01 create-cluster]# ./create-cluster create > >> Performing hash slots allocation on 6 nodes... Master[0] -> Slots 0 - 5460 # 主节点1分配了0~5460个槽位 Master[1] -> Slots 5461 - 10922 Master[2] -> Slots 10923 - 16383 Adding replica 127.0.0.1:30005 to 127.0.0.1:30001 Adding replica 127.0.0.1:30006 to 127.0.0.1:30002 Adding replica 127.0.0.1:30004 to 127.0.0.1:30003 > >> Trying to optimize slaves allocation for anti-affinity [WARNING] Some slaves are in the same host as their master M: 2fdfba4c063aa6fca428f4fced8427da28ec12be 127.0.0.1:30001 slots:[0-5460] (5461 slots) master M: 849e6ddf02017ce713c7a1dc2480d3870f2aee00 127.0.0.1:30002 slots:[5461-10922] (5462 slots) master M: c5faf88b4462b2ff62d150165d82e338c3dde013 127.0.0.1:30003 slots:[10923-16383] (5461 slots) master S: 70c0cedacdbef28a09def8343000ab365f1026d7 127.0.0.1:30004 replicates c5faf88b4462b2ff62d150165d82e338c3dde013 S: 75be43142db225ca741728740c061c58f2a0d946 127.0.0.1:30005 replicates 2fdfba4c063aa6fca428f4fced8427da28ec12be S: 538e3647ec21e1a0957ff91145163e0f4a16fcb8 127.0.0.1:30006 replicates 849e6ddf02017ce713c7a1dc2480d3870f2aee00 Can I set the above configuration? (type 'yes' to accept): yes > >> Nodes configuration updated > >> Assign a different config epoch to each node > >> Sending CLUSTER MEET messages to join the cluster Waiting for the cluster to join .. > >> Performing Cluster Check (using node 127.0.0.1:30001) M: 2fdfba4c063aa6fca428f4fced8427da28ec12be 127.0.0.1:30001 slots:[0-5460] (5461 slots) master 1 additional replica(s) S: 70c0cedacdbef28a09def8343000ab365f1026d7 127.0.0.1:30004 slots: (0 slots) slave replicates c5faf88b4462b2ff62d150165d82e338c3dde013 M: c5faf88b4462b2ff62d150165d82e338c3dde013 127.0.0.1:30003 slots:[10923-16383] (5461 slots) master 1 additional replica(s) M: 849e6ddf02017ce713c7a1dc2480d3870f2aee00 127.0.0.1:30002 slots:[5461-10922] (5462 slots) master 1 additional replica(s) S: 538e3647ec21e1a0957ff91145163e0f4a16fcb8 127.0.0.1:30006 slots: (0 slots) slave replicates 849e6ddf02017ce713c7a1dc2480d3870f2aee00 S: 75be43142db225ca741728740c061c58f2a0d946 127.0.0.1:30005 slots: (0 slots) slave replicates 2fdfba4c063aa6fca428f4fced8427da28ec12be [OK] All nodes agree about slots configuration. > >> Check for open slots... > >> Check slots coverage... [OK] All 16384 slots covered. [root@hadoop01 create-cluster]#
3、使用
比如我们现在创建一个普通客户端连接30001
1
2
3
4
[root@hadoop01 create-cluster]# redis-cli -p 30001 127.0.0.1:30001> set k1 qweqweqw (error) MOVED 12706 127.0.0.1:30003 127.0.0.1:30001>
发现报错了,其实就是前面讲的,传进去的key经过hash+取模之后,发现车存储的槽位和节点不在30001上,而这种普通的连接方式只能以报错+MOCED关键字的形式返回
要正确处理就需要加上-c:-c即cluster
1
2
3
4
5
6
7
8
9
10
11
12
13
[root@hadoop01 create-cluster]# redis-cli -c -p 30001 127.0.0.1:30001> set k1 12313123123 # 会跳到节点30003 -> Redirected to slot [12706] located at 127.0.0.1:30003 OK 127.0.0.1:30003> set k2 3ed33d3d -> Redirected to slot [449] located at 127.0.0.1:30001 OK 127.0.0.1:30001> get k2 "3ed33d3d" 127.0.0.1:30001> get k1 -> Redirected to slot [12706] located at 127.0.0.1:30003 "12313123123" 127.0.0.1:30003>
需要注意一件事:
1
2
3
4
5
6
7
8
9
10
11
12
13
127.0.0.1:30003> WATCH k2 -> Redirected to slot [449] located at 127.0.0.1:30001 OK 127.0.0.1:30001> MULTI # 事务时开在30001上的,即命令时缓存在30001上的 OK 127.0.0.1:30001> set k1 34rf34434rf -> Redirected to slot [12706] located at 127.0.0.1:30003 OK 127.0.0.1:30003> set key sadasdas OK 127.0.0.1:30003> exec # 所以这里执行的时候,就会报错 (error) ERR EXEC without MULTI 127.0.0.1:30003>
那如何解决:用hash_tag,就可以正常使用了
1
2
3
4
5
6
7
8
9
10
11
12
13
14
127.0.0.1:30003> set {oo}k1 321312312312 -> Redirected to slot [1629] located at 127.0.0.1:30001 OK 127.0.0.1:30001> set {oo}k2 32wed323f23 OK 127.0.0.1:30001> WATCH {oo}k1 OK 127.0.0.1:30001> MULTI OK 127.0.0.1:30001> set {oo}k2 2x32d32d3 QUEUED 127.0.0.1:30001> exec 1) OK 127.0.0.1:30001>
4、结束节点
1
2
3
4
5
6
7
8
9
[root@hadoop01 create-cluster]# ./create-cluster stop Stopping 30001 Stopping 30002 Stopping 30003 Stopping 30004 Stopping 30005 Stopping 30006 [root@hadoop01 create-cluster]# ./create-cluster clean
5、自定义节点
当然也可以不使用脚本,而是使用客户端命令指定,可以使用redis-cli --cluster help查看
注意这种情况需要在集群的配置文件中开启:
我们先把那6台机器启动:
1
2
3
4
5
6
7
[root@hadoop01 create-cluster]# ./create-cluster start Starting 30001 Starting 30002 Starting 30003 Starting 30004 Starting 30005 Starting 30006
槽位分配我自己指定,
1
2
3
4
5
6
7
8
9
10
11
12
13
14
15
16
17
18
19
20
21
22
23
24
25
26
27
28
29
30
31
32
33
34
35
36
37
38
39
40
41
42
43
44
45
46
47
48
49
50
51
52
53
[root@hadoop01 create-cluster]# redis-cli --cluster create 127.0.0.1:30001 127.0.0.1:30002 127.0.0.1:30003 127.0.0.1:30004 127.0.0.1:30005 127.0.0.1:30006 --cluster-replicas 1 > >> Performing hash slots allocation on 6 nodes... Master[0] -> Slots 0 - 5460 Master[1] -> Slots 5461 - 10922 Master[2] -> Slots 10923 - 16383 Adding replica 127.0.0.1:30005 to 127.0.0.1:30001 Adding replica 127.0.0.1:30006 to 127.0.0.1:30002 Adding replica 127.0.0.1:30004 to 127.0.0.1:30003 > >> Trying to optimize slaves allocation for anti-affinity [WARNING] Some slaves are in the same host as their master M: 999245f7a1472d76a466eb77e5affc0ca014d8bf 127.0.0.1:30001 slots:[0-5460] (5461 slots) master M: 7f7d6d96810d33cef99401a3d02dad959b266d39 127.0.0.1:30002 slots:[5461-10922] (5462 slots) master M: 9431d5aebbc8d2ccd3a7494067dc559b948cc623 127.0.0.1:30003 slots:[10923-16383] (5461 slots) master S: 841944826c05e8275375fb4d164f16eb46f4a9a2 127.0.0.1:30004 replicates 7f7d6d96810d33cef99401a3d02dad959b266d39 S: 0fedc1b0730a888c38e9fb8a024e8aa3be9b0ee5 127.0.0.1:30005 replicates 9431d5aebbc8d2ccd3a7494067dc559b948cc623 S: 81bda6c470225a0cd7c4287b47d037cbbb81f608 127.0.0.1:30006 replicates 999245f7a1472d76a466eb77e5affc0ca014d8bf Can I set the above configuration? (type 'yes' to accept): yes > >> Nodes configuration updated > >> Assign a different config epoch to each node > >> Sending CLUSTER MEET messages to join the cluster Waiting for the cluster to join .. > >> Performing Cluster Check (using node 127.0.0.1:30001) M: 999245f7a1472d76a466eb77e5affc0ca014d8bf 127.0.0.1:30001 slots:[0-5460] (5461 slots) master 1 additional replica(s) S: 81bda6c470225a0cd7c4287b47d037cbbb81f608 127.0.0.1:30006 slots: (0 slots) slave replicates 999245f7a1472d76a466eb77e5affc0ca014d8bf S: 841944826c05e8275375fb4d164f16eb46f4a9a2 127.0.0.1:30004 slots: (0 slots) slave replicates 7f7d6d96810d33cef99401a3d02dad959b266d39 M: 9431d5aebbc8d2ccd3a7494067dc559b948cc623 127.0.0.1:30003 slots:[10923-16383] (5461 slots) master 1 additional replica(s) S: 0fedc1b0730a888c38e9fb8a024e8aa3be9b0ee5 127.0.0.1:30005 slots: (0 slots) slave replicates 9431d5aebbc8d2ccd3a7494067dc559b948cc623 M: 7f7d6d96810d33cef99401a3d02dad959b266d39 127.0.0.1:30002 slots:[5461-10922] (5462 slots) master 1 additional replica(s) [OK] All nodes agree about slots configuration. > >> Check for open slots... > >> Check slots coverage... [OK] All 16384 slots covered. [root@hadoop01 create-cluster]#
这样做的好处就是,现在写的是本地127.0.0.1,实际上可以给到6台机器的IP地址,这样就可以启动一个分布式的集群了
使用客户端链接redis-cli -c -p 30001连接:
1
2
3
4
5
6
7
[root@hadoop01 create-cluster]# redis-cli -c -p 30001 127.0.0.1:30001> set k1 assdas -> Redirected to slot [12706] located at 127.0.0.1:30003 OK 127.0.0.1:30003> get k1 "assdas" 127.0.0.1:30003>
跟刚才一样,会跳到其他节点。
6、reshard
数据有倾斜,如何移动它
1
2
3
4
5
6
7
8
9
10
11
12
13
14
15
16
17
18
19
20
21
22
23
24
25
26
27
28
29
30
31
32
33
34
35
36
37
38
39
40
41
42
43
44
45
46
47
48
49
50
51
52
[root@hadoop01 create-cluster]# redis-cli --cluster reshard 127.0.0.1:30001 # 最后面随意指定一个活动的结点即可 > >> Performing Cluster Check (using node 127.0.0.1:30001) M: 0a4d824cdd85e2410dbc29b61b5cc9be21ec36b2 127.0.0.1:30001 slots:[0-5460] (5461 slots) master 1 additional replica(s) S: 90b6d51390cfa0147e83db4491407b2dc1b7e596 127.0.0.1:30004 slots: (0 slots) slave replicates 3db0c4c048bc7295949004f2e4f1c5a7fc0b4794 S: 0675d7ddf10a76683a8895f5039c94e5ca4c9d89 127.0.0.1:30006 slots: (0 slots) slave replicates 25744a44d3435da17f26d5a8aa509b5ef74e74b1 S: 0cbb694a6524d40faab057ef12db117d1e59a541 127.0.0.1:30005 slots: (0 slots) slave replicates 0a4d824cdd85e2410dbc29b61b5cc9be21ec36b2 M: 3db0c4c048bc7295949004f2e4f1c5a7fc0b4794 127.0.0.1:30003 slots:[10923-16383] (5461 slots) master 1 additional replica(s) M: 25744a44d3435da17f26d5a8aa509b5ef74e74b1 127.0.0.1:30002 slots:[5461-10922] (5462 slots) master 1 additional replica(s) [OK] All nodes agree about slots configuration. > >> Check for open slots... > >> Check slots coverage... [OK] All 16384 slots covered. How many slots do you want to move (from 1 to 16384)? 2000 # 你想移动多少槽位,比如这里设置为2000 What is the receiving node ID? 25744a44d3435da17f26d5a8aa509b5ef74e74b1 # 要把这2000个槽位发给谁(根据上面的现实指定id) Please enter all the source node IDs. Type 'all' to use all the nodes as source nodes for the hash slots. # all:就是在其他节点均衡的抽一些 Type 'done' once you entered all the source nodes IDs. Source node #1: 0a4d824cdd85e2410dbc29b61b5cc9be21ec36b2 # 从某一台抽取(从第一台抽取 ) Source node #2: done Ready to move 2000 slots. Source nodes: M: 0a4d824cdd85e2410dbc29b61b5cc9be21ec36b2 127.0.0.1:30001 slots:[0-5460] (5461 slots) master 1 additional replica(s) Destination node: M: 25744a44d3435da17f26d5a8aa509b5ef74e74b1 127.0.0.1:30002 slots:[5461-10922] (5462 slots) master 1 additional replica(s) Resharding plan: Moving slot 0 from 0a4d824cdd85e2410dbc29b61b5cc9be21ec36b2 Moving slot 1 from 0a4d824cdd85e2410dbc29b61b5cc9be21ec36b2 Moving slot 2 from 0a4d824cdd85e2410dbc29b61b5cc9be21ec36b2 Moving slot 3 from 0a4d824cdd85e2410dbc29b61b5cc9be21ec36b2 Moving slot 4 from 0a4d824cdd85e2410dbc29b61b5cc9be21ec36b2 ... Moving slot 1998 from 0a4d824cdd85e2410dbc29b61b5cc9be21ec36b2 Moving slot 1999 from 0a4d824cdd85e2410dbc29b61b5cc9be21ec36b2 Do you want to proceed with the proposed reshard plan (yes/no)? yes # 输入yes即可开始移动
通过查看槽位信息就可以知道变化了,因为之前是均匀的
1
2
3
4
5
6
7
8
[root@hadoop01 create-cluster]# redis-cli --cluster info 127.0.0.1 30001 127.0.0.1:30001 (0a4d824c...) -> 0 keys | 3461 slots | 1 slaves. 127.0.0.1:30003 (3db0c4c0...) -> 1 keys | 5461 slots | 1 slaves. 127.0.0.1:30002 (25744a44...) -> 0 keys | 7462 slots | 1 slaves. [OK] 1 keys in 3 masters. 0.00 keys per slot on average. [root@hadoop01 create-cluster]#
或者通过check查看,发现第一台1~2000的槽位没有了
1
2
3
4
5
6
7
8
9
10
11
12
13
14
15
16
17
18
19
20
21
22
23
24
25
26
27
28
29
30
31
[root@hadoop01 create-cluster]# redis-cli --cluster check 127.0.0.1 30001 127.0.0.1:30001 (0a4d824c...) -> 0 keys | 3461 slots | 1 slaves. 127.0.0.1:30003 (3db0c4c0...) -> 1 keys | 5461 slots | 1 slaves. 127.0.0.1:30002 (25744a44...) -> 0 keys | 7462 slots | 1 slaves. [OK] 1 keys in 3 masters. 0.00 keys per slot on average. > >> Performing Cluster Check (using node 127.0.0.1:30001) M: 0a4d824cdd85e2410dbc29b61b5cc9be21ec36b2 127.0.0.1:30001 slots:[2000-5460] (3461 slots) master 1 additional replica(s) S: 90b6d51390cfa0147e83db4491407b2dc1b7e596 127.0.0.1:30004 slots: (0 slots) slave replicates 3db0c4c048bc7295949004f2e4f1c5a7fc0b4794 S: 0675d7ddf10a76683a8895f5039c94e5ca4c9d89 127.0.0.1:30006 slots: (0 slots) slave replicates 25744a44d3435da17f26d5a8aa509b5ef74e74b1 S: 0cbb694a6524d40faab057ef12db117d1e59a541 127.0.0.1:30005 slots: (0 slots) slave replicates 0a4d824cdd85e2410dbc29b61b5cc9be21ec36b2 M: 3db0c4c048bc7295949004f2e4f1c5a7fc0b4794 127.0.0.1:30003 slots:[10923-16383] (5461 slots) master 1 additional replica(s) M: 25744a44d3435da17f26d5a8aa509b5ef74e74b1 127.0.0.1:30002 slots:[0-1999],[5461-10922] (7462 slots) master 1 additional replica(s) [OK] All nodes agree about slots configuration. > >> Check for open slots... > >> Check slots coverage... [OK] All 16384 slots covered. [root@hadoop01 create-cluster]#
Redis提供了这种比较灵活的方案,即可以收工配置。
如果您喜欢此博客或发现它对您有用,则欢迎对此发表评论。 也欢迎您共享此博客,以便更多人可以参与。 如果博客中使用的图像侵犯了您的版权,请与作者联系以将其删除。 谢谢 !